Fuel injectors play an essential role in keeping your vehicle engine running smoothly by delivering the right amount of fuel for combustion. But over time, they can become clogged with debris or deposits, impacting your engine’s performance, fuel efficiency, and overall driving experience. If you’re noticing issues like rough idle, poor acceleration, or a decrease in fuel economy, you might be dealing with a clogged fuel injector. Fortunately, testing for a clogged fuel injector is something many DIY car owners and auto enthusiasts can do at home—with the right guidance.
This comprehensive guide will walk you through how to test for a clogged fuel injector and provide proactive steps to keep your fuel injection system in optimal condition.
Signs of Clogged Fuel Injectors
Before jumping into testing, it’s important to understand the common signs of a fuel injector problem. Here are some clogged fuel injector symptoms that might tip you off to an issue:
- Rough Idle: A blocked injector disrupts fuel delivery, causing the engine to sputter or shake when idling.
- Decreased Acceleration: Slow or weak throttle response may indicate a fuel injection fault.
- Engine Misfire: When fuel flow inside the combustion chamber is insufficient, a misfire can occur.
- Check Engine Light: An illuminated check engine light is often a sign of injector-related trouble. Use an OBD-II scanner to check diagnostic codes.
- Reduced Fuel Efficiency: Clogged injectors often waste fuel or obstruct proper fuel delivery, decreasing fuel mileage.
- Fuel Odors: Leaked fuel around the engine may point to faulty or damaged injectors.
If these blocked injector symptoms sound familiar, it’s time to investigate further.
Tools You’ll Need for Testing Fuel Injectors
Before you start, gather the following tools to make your testing process smooth and efficient:
- OBD-II scanner for error codes
- Multimeter for electrical testing
- Fuel pressure gauge
- A small screwdriver or stethoscope for a sound check
- Safety gloves and goggles
How to Test for a Clogged Fuel Injector
Now that you’re ready, here are some detailed steps for how to test fuel injectors on a car and identify whether they are clogged or faulty.
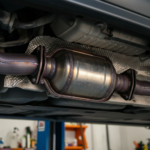
Step 1: Perform a Visual Inspection
Check the injectors for visible signs of damage, cracks, or leaks. A fuel injector problem might be indicated by fuel residue around the injector body.
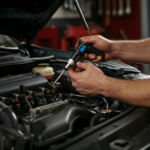
Step 2: Listen for Clicking Sounds
Start the engine and use a mechanic’s stethoscope or a small screwdriver to listen to each injector. Place the tool against the injector and listen for a consistent clicking sound. If there’s no clicking, the injector might be clogged or electrically faulty.
Step 3: Use a Fuel Pressure Gauge
Connect a fuel pressure gauge to the fuel rail. Start the engine and monitor the gauge for irregularities. If the reading drops when testing each injector, it might be clogged or delivering insufficient fuel.
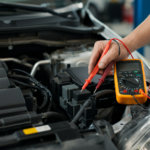
Step 4: Conduct an Electrical Test
Use a multimeter to check the electrical resistance of the injector. Compare the readings to the specifications in your vehicle’s manual. Abnormal readings often mean the injector is faulty or clogged.
Step 5: Perform a Spray Pattern Test
If you’re comfortable removing the injector, conduct a fuel injection testing spray pattern check. Remove the injector from the fuel rail, supply it with fuel, and activate it to see how evenly it sprays. A clogged injector may result in an irregular spray pattern.
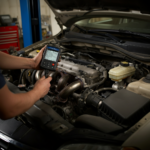
Step 6: Use an OBD-II Scanner
A quick way to check fuel injection system issues is by running diagnostics with an OBD-II scanner. Look for error codes that point to a potential fuel injector problem or fuel delivery issues.
Cleaning or Replacing Clogged Fuel Injectors
If a test reveals that an injector is clogged, don’t panic! There are several ways to address the issue.
Cleaning Injectors Without Removal
Using a premium fuel injector cleaner, you can dissolve mild deposits by adding the cleaner to your gas tank. Check out AutoZone’s guide for a step-by-step tutorial on this method.
Cleaning Injectors With Removal
For severe clogs, injectors may need to be removed and professionally cleaned. Alternatively, you can purchase a fuel injector cleaning kit to do it yourself.
When to Replace Injectors
If cleaning doesn’t resolve the problem, it might be time to replace the injector. Some signs, like cracks or excessive corrosion, mean the injector is beyond repair.
Preventing Future Issues with Fuel Injectors
Prevention is always better than repair. Here are a few tips to maintain healthy injectors and avoid recurring issues:
- Use High-Quality Fuel: Opt for fuel with cleaning additives to reduce buildup.
- Clean Fuel Injectors Regularly: Use a cleaner every 3,000 to 5,000 miles or as per your vehicle’s requirements.
- Replace the Fuel Filter: A clogged filter can contaminate fuel injectors with debris and restrict fuel delivery.
- Schedule Regular Maintenance: Have your fuel system checked during routine auto repair services to catch problems early.
Seek Professional Help
Not every car injector test can be done at home. If you’re still unsure about how to test injectors at home, or if DIY solutions aren’t solving the issue, it’s best to consult a mechanic. For more detailed insights, check out this guide on fuel injector symptoms and solutions.
Keep Your Engine Running Smoothly
Testing and maintaining fuel injectors is crucial for prolonging your car’s lifespan, boosting fuel efficiency, and ensuring optimal engine performance. By following the above steps, you can diagnose and troubleshoot injector problems without the need for costly repairs.
Keep your fuel injection system clean, and you’ll enjoy smoother rides and better fuel economy in the long run.
Want to learn more about improving your vehicle’s performance? Visit AutoZone’s DIY resources for professional tips on injector cleaning and auto repair solutions.